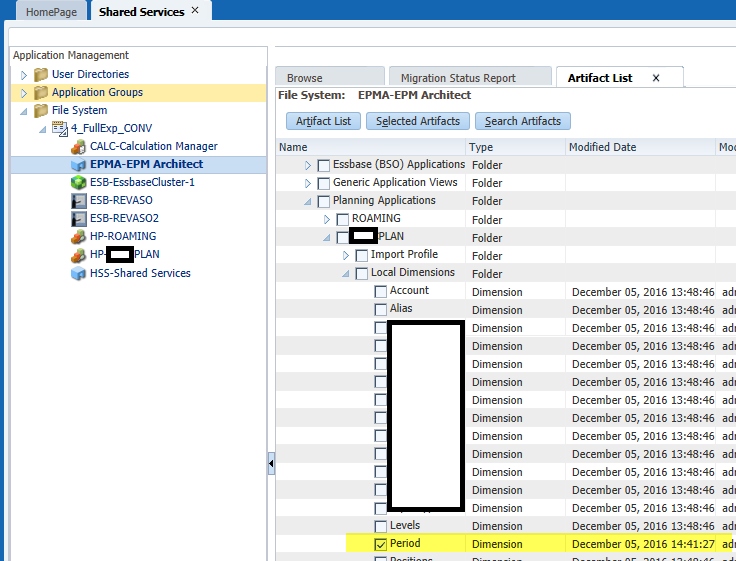
Security Devices, only as good as their implementation…
Recently, I needed to use an old program that is protected by a security device. The device, an M Activator hardware key, connects to your computer’s parallel port.
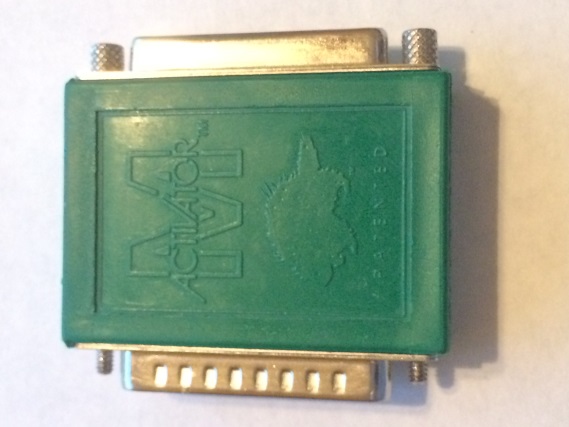
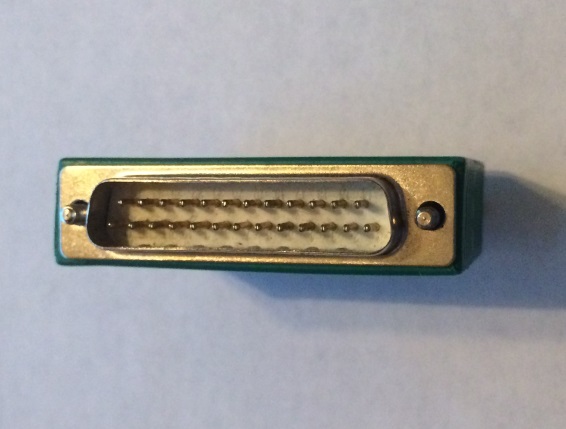
Figure 1 – M Activator Security Key
If the security device is not attached to the PC, the application program will restrict your access to certain application functions or prevent you from using an application altogether.
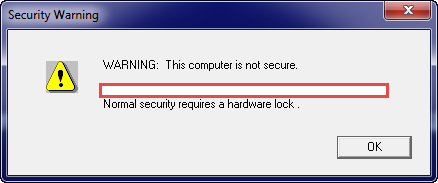
Figure 2 – Application Rejection due to no hardware key
Since I own the software and still have the security key, none of this should be a problem. Unfortunately, modern computers no longer have parallel ports! As the software isn’t maintained, I can’t call the original provider for an alternative leaving me with few choices. The first, and preferred, choice was to purchase a parallel port to USB adapter on-line. I purchased two highly rated units; however, the software failed to recognize the dongle when connected through either of the units.

Figure 3 – Parallel to USB Adapters (that didn’t work..)
As the USB adapter routed was unsuccessful, my remaining option is to …. hack the security key or its implementation in the application program..
A Ridiculously Brief Discussion on Security/Hacking
The first rule of hacking is that you don’t talk about hacking. Wait, or is that the first rule of Fight Club? The first rule of hacking is to accept the fact that nothing will be 100% secure.
When a product is developed, the security implementation is typically driven many factors such as:
- What is the risk/damage of being compromised?
- How likely is it that the product will be attacked?
- What impacts to the development process will occur due to security?
- How will the timeline be impacted?
- How will users of the product be impacted?
- Does the development team understand and have security experience?
- How much will can we afford????
Because of all of the competing considerations, product security typically looks more like the Griswold family truckster than the shiny red Ferrari.

Figure 4 – Typical Security vs Assumed Security
From the hacker’s perspective, product security really boils down to how badly they want it. Do they have the time, resources, team/skills, and money to dedicate to their mission.
In the case of my ancient dongle security application, I’m willing to invest about 60 minutes into seeing if I can get anywhere. After that, I dig out one of my older computers and use it with this program. (and hope it doesn’t ever die…..)
With that said, let’s see just how secure this old dongle application is…
Hacking 101
Now that we’ve decided that we’re going to take a stab at working around the security device, the first thing we need to do is gather information about our target. Before we can formulate a plan, we need to know what we’re up against. After about 5 minutes of research, we know the following about our target application/security device:
- Application Program
- Windows 32 bit executable
- Written in C++
- Program appears to leverage multiple external libraries, some of which are known/some are not
- ZIP/PKZIP – File Compression
- W32SSI.dll/.lib – ? Not sure. (yet)
- M Activator Green Key
- Made by Sentinel
- The W32SSI files are related to this dongle
NOTE: Researching this scenario finds a lot of “hits” to people with similar scenarios. There are emulators and other products made to solve this problem; however, I’d rather try to figure it out myself first.
Given what has been found, it seems likely that the application program is going to use the W32SSI files to talk to the dongle. Depending on how this is done in the application, we may be able to update the application program and simply bypass the dongle. All we need to do is take a peek at the application software to see what is going on, no biggie.
Source Code, Assembly Code, Machine Code, Oh My!
If this were our application program, we could simply open it in our editor, make our desired changes to the source code, recompile the code, and be on our way. Since we didn’t write this program and the original company is no longer in existence, this isn’t an option. While we could look at the executable binary (e.g. Machine Code) unless you have a photographic memory, know low-level Windows modules by heart, and Intel OpCodes like the back of your hand, it’s going to be impossible to directly analyze the chain of files.
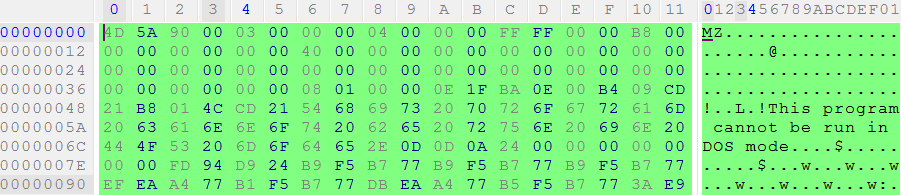
Figure 5 – Machine Code, no problem…..
While it might be cool to rattle off machine code instructions on trivia night, it would take us forever to try and analyze an application in this manner. Fortunately, there are many programs that we can leverage which will translate the machine code into something slightly easier to deal with, assembly code.
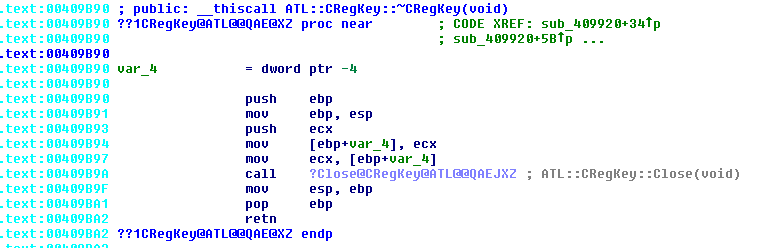
Figure 6 – Assembly Code
While assembly code is not nearly as friendly as actual source code, it is a 1 to 1 representation of the machine code in a somewhat human readable format. If you have an appropriate tool, such as the IDA Pro disassembler, you can convert the machine code into the assembly. This tool also allows us to map out the program flow and find text and object file references.
Using the IDA Interactive Disassembler
As mentioned previously, we can use IDA to do a quick search to see if our security device program is called. Since we know that the program uses the security key, we should be able to find one or more references to the W32SSI library files. Depending on how many and what type of references we find, we may be able to easily alter the program so that we can bypass the security hardware.
After opening the program in IDA, we can easily see that the W32SSI libraries are being used by checking the Imports section of IDA.

Figure 7- IDA Imports
In addition to verifying the presence of the libraries via the Imports screen, we can use the Functions / IDA view to find the code references:
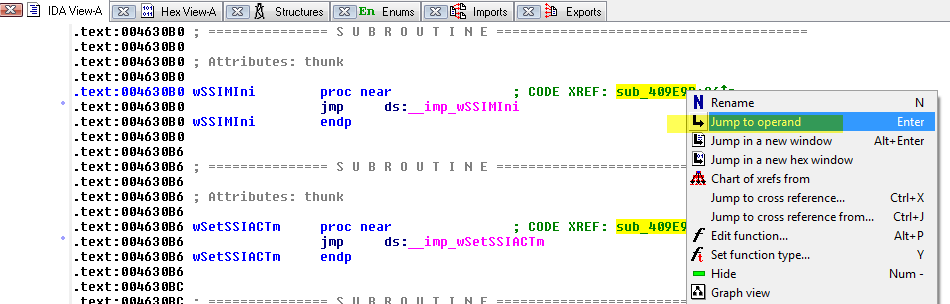
Figure 8 – Locating code references to W32SSI
Somewhat surprisingly, the only two functions imported from the security program are referenced once!
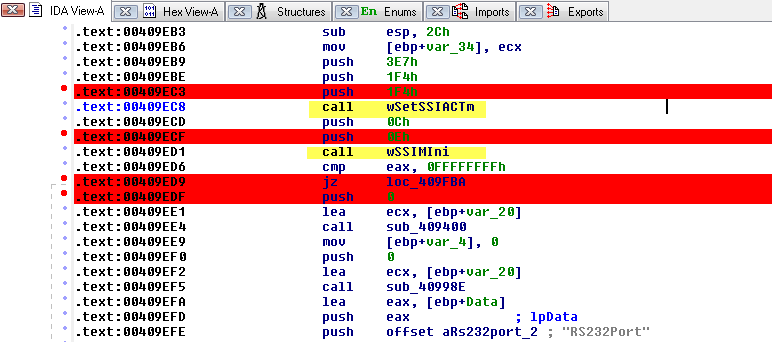
Figure 9 – Code section using W32SSI functions
While we do not know what those routines do entirely, since they are only called once, it is safe to assume that they attempt to validate that a security key, of the right type, is connected. To help understand what we’re seeing, we can use the Graph View feature to get a visual representation of the code:
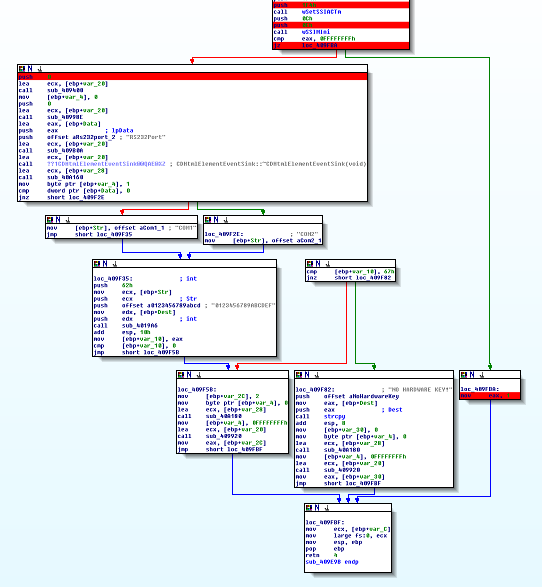
Figure 10 – Graph View of W32SSI logic
Looking at the Graph View of the code leveraging the W32SSI routines, we see that there are two main code branches. The branch on the left performs secondary checks and ultimate ends up with failure messages relating to a security key not being found. The code branch on the right simply returns a value of 1, which presumably is a “TRUE” response.
The Quick and Easy Fix
Looking at the code structure, it appears that the second W32SSI call is performing a check as to whether the security dongle is present or not. If the security dongle is found, a “TRUE” (1) is returned; otherwise, secondary tests are performed. (e.g. serial port instead of LPT, etc.)
Because of this, there appears to be a very easy way to “fix” the program. If we force the initial check to always return TRUE (or flip flop the PASS / FAIL check) then the application program will behave as if the key was present.
The following logic needs to be tweaked from:
call wSSIMIni
cmp eax, 0FFFFFFFFh
jz loc_409FBA
to:
call wSSIMIni
cmp eax, 0FFFFFFFFh
jnz loc_409FBA
JZ and JNZ are machine code instructions that are used in conjunction with comparison checks. If the result of a compare (CMP) instruction is ZERO, a Jump if Zero (JZ) instruction will result in a jump to another portion of the application. Jump if Not Zero (JNZ), on the other hand, results in a jump if the compare (CMP) instruction is non-zero.
To make the change, switch to the Hex View, right click on the highlight value and change the 84 to 85.
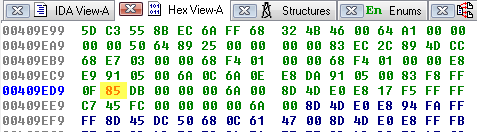
Figure 11 – Switching JZ to JNZ
After committing the change, you will see the code switch from
![]()
to
![]()
After starting the program, we no longer receive an error about the missing security key and the program operates as expected.
Well That Easy…..
While it may be hard to believe that changing one byte of data, by one digit, entirely bypassed an application’s security, this is a surprisingly common scenario. The security dongle used by this application could have been utilized much differently preventing this type of scenario, though. (e.g. the dongle could have stored a required piece of information that the application would need to operated properly)


