Browse Tag

Oracle

EPM Automate – State Management “Public Safety Announcement”

Overview

EPM Automate is an Oracle provided command line interface which is used for interfacing with Oracle Cloud EPM applications. These applications expose REST API endpoints for consumption to accomplish a wide variety of activities. (data loading, user management, maintenance, rules execution, etc., etc., etc.) The EPM Automate utility allows users to consume the REST API endpoints without having to write writing code. This is useful for application administrators and power users who wish to perform certain activities without having to navigate the applications graphical user interface. The utility can also be utilized by automation processes to reduce technical debt/maintenance overhead since it abstracts the API details.

Using EPM Automate is relatively simple as you just download/install the utility, on a Windows or Linux system, and issues commands via the command line. Commands are issued one after another in the necessary sequence to perform a particular task. In the example below, I am connecting to an EPM Cloud application, requesting the value of a substitution variable, and then logging out of the application.

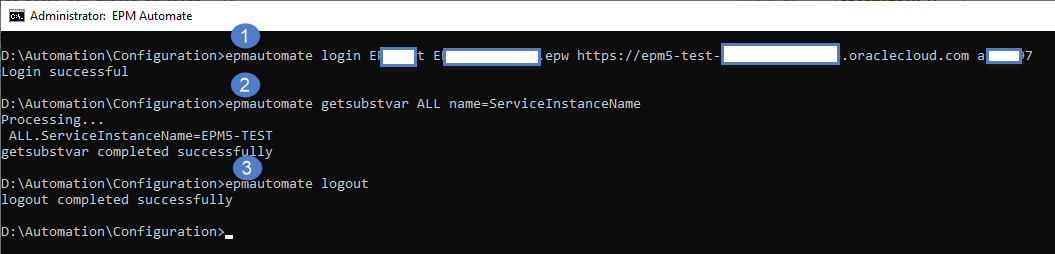
After logging into the application, you can run as many individual commands as you would like and you can leave you ‘session’ open for some time w/o having to provide authenticate again. Even though the underlying API calls are executed separately, and you are not providing credentials for each command issue, the EPM Automate utility is maintaining state behind the scenes.

While this approach is convenient for the user, it is important to understand how this is being accomplished as misuse can result in potentially serious issues! The purpose of this post is to educate you on how EPM Automate State Management behaves and how to avoid any serious issues based on its design. Additionally, I’ll provide some future update thoughts which could address the concern raised here.

State Management

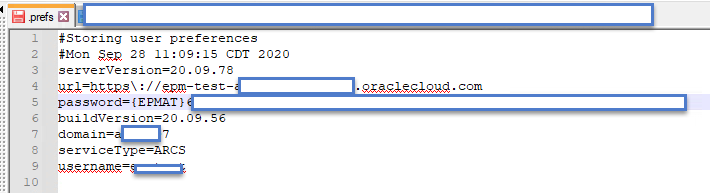
State Management is accomplished through a text file called .prefs. This file contains all of the relevant information that EPM Automate requires to communicate & authenticate with the REST API. The file is created after you successfully execute a ‘login’ command in EPM Automate.

In the early releases of the utility, Oracle stated that you should not run more than one instance of this utility at the same time. While they didn’t elaborate as to why, the issue revolved around the .prefs file. While they have made updates to the application to help address the issue, there are still some gaps which could lead to undesirable consequences.

The (mostly resolved) Issue

The issue with the .prefs file occurs when you have more than one instance of EPM Automate concurrently in use on the same machine. Originally, the .prefs file was placed in a fixed folder meaning that all instances would be reading/writing the same file and the last successful login attempt by any user on the machine would overwrite the others! If those sessions were working against the same application, not a big deal; however, if the sessions were interacting with different applications, this would be bad. The best movie analogy would be Ghostbusters’ “DON’T CROSS THE STREAMS!”

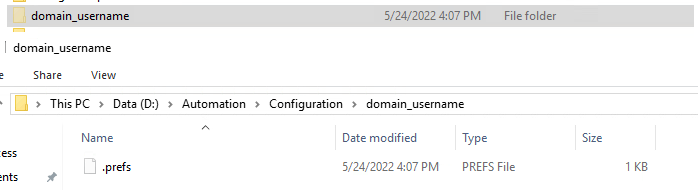
Since the original version of EPM Automate, they have adjusted this logic to allow for concurrent execution by different users. To accomplish this, the .prefs file is moved under a hidden subfolder which reflects the logged on user’s information.

By keying off of the username, this ensures that separate users will not have a collision and can operate safely.

But what happens if the same user wants to be super-efficient and do work on two different Cloud EPM applications concurrently? (it will depend, based on how careful you are!)

Crossing the Streams, for Science!

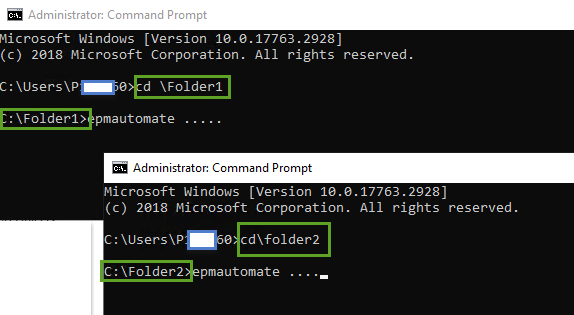
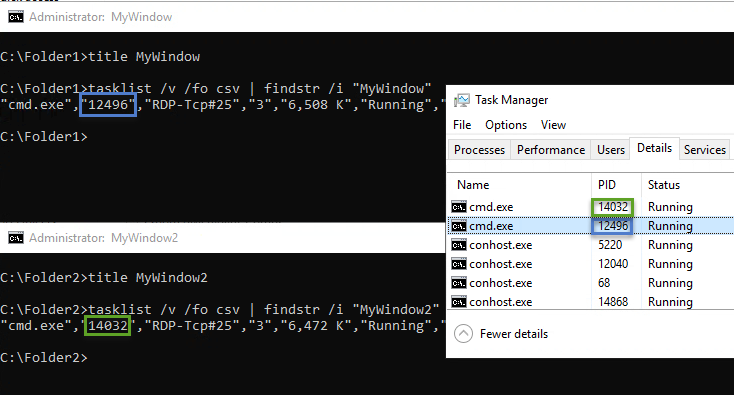
To demonstrate what could happen, we will open two separate Command Windows and just jump right into issue EPM Automate commands.

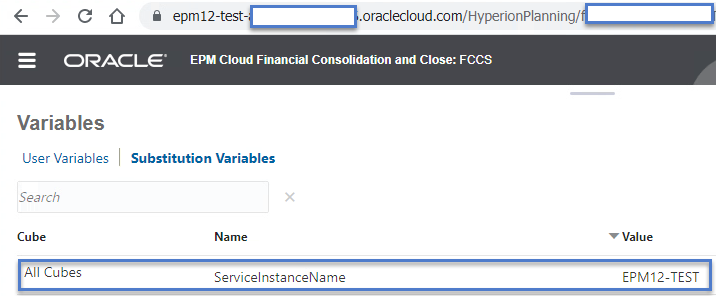
Before issuing EPM Automate commands, I’ve added a global substitution variable “ServiceInstanceName” which will hold the service instance name to two FCCS applications.

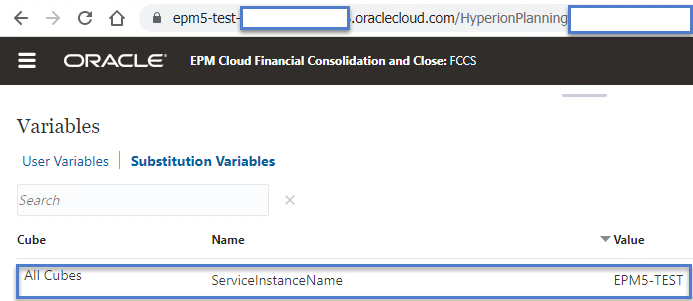
After creating the substitution variables, we will connect to one application at a time and query the substitution variable to see what we get

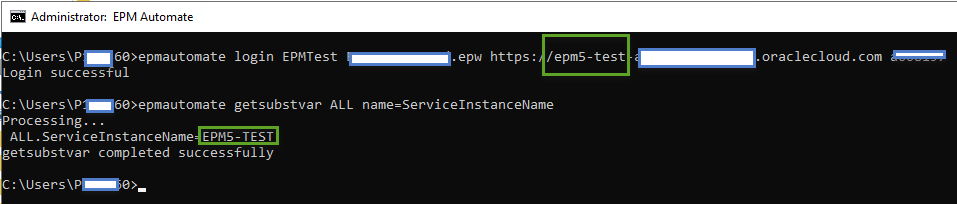
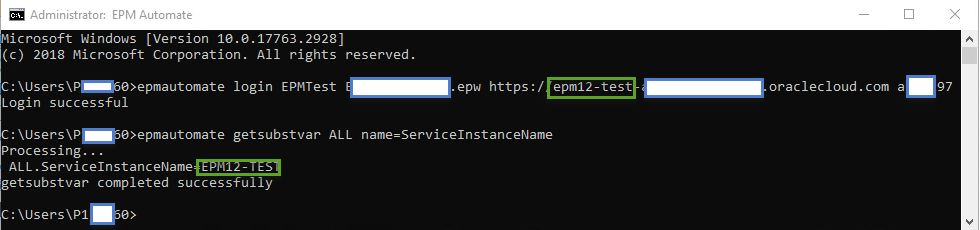
Next, let’s do the same thing for the second server:

Now, let’s go back to the first window and query the variable again.

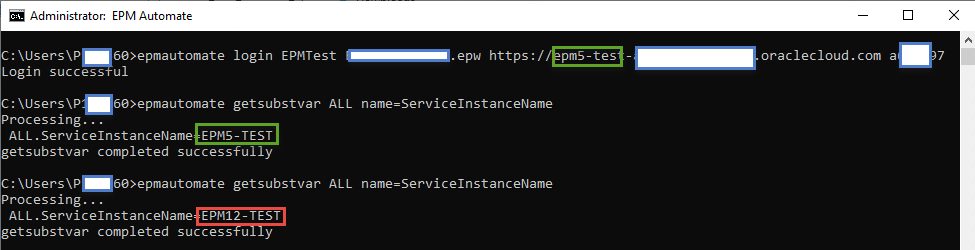
As you can see above, running two concurrent processes as the same user can lead to some undesirable results. While my example is simply reading a variable, imagine what would happen if you logged into a second application and triggered a wipe/reset of the 1st? Oops!

Easy Workaround

Fortunately, there is an easy workaround. Before starting your EPM Automate sessions, ensure that you are working from different folders and all will be fine since the .prefs files will be created in different locations.

Future Update Thoughts

To fully prevent this issue from impacting interactive users, EPM Automate could append the Process ID (PID) to the folder name which houses the .prefs file. This would ensure that each & every command window has a distinct folder/file.

While this would be a quick/easy fix for interactive users, this would create a potential headache for anyone who is using EPM Automate in a non-interactive manner if EPM Automate commands are being issued in separate sessions. (e.g., AutoSys, Control-M, etc.). To address this, Oracle cloud add an optional command line parameter (“prefsfile”) to allow for explicitly setting the location of the .prefs file.

Oracle Inventory User Maintenance Scenarios

Overview

The Oracle Inventory is a series of registry entries and files that keep track of all Oracle products / patches that are installed on a machine. As certain portions of Oracle Inventory are stored in a user specific manner, product and patching problems can occur if multiple user accounts are utilized for product installation and/or patching operations. (e.g. User 1 installs Product A, and User 2 attempts to patch Product A)

Common Oracle Inventory / User related scenarios / solutions are:

  1. A user account is used to install software / apply patches and this account is disabled / deleted at a later date – Assuming no additional Oracle software has been installed, this is easy to fix via a combination of file copy / registry updates.
  2. Multiple user accounts have been used to install Oracle Software – In this scenario, the inventory needs to be recreated under one user regardless as to whether the accounts exist or not.

[IMPORTANT – It is strongly recommended to install/patch all software with a non-user specific account, where possible.  While certain security policies may not allow this, using a global account will ensure you do not have to perform the steps in this document.  ]

Prior install account has been disabled / deleted

In this scenario, an account used to install the Oracle EPM Software has been disabled / deleted and we are unable to patch the environment as the Oracle Inventory for the current user does not have knowledge of the prior installed products. The recommended fix is to reassign the previous user account’s Oracle Inventory to the new user account.

To move the Oracle Inventory, perform the following steps:

  1. Identify service account and setup with local administrator access on all Hyperion machines
  2. Copy .oracle.instances file from the user account which was used previously to the new account. In the example below, the user was epm_admin making the path to the file C:\Users\epm_admin\.oracle.instances.
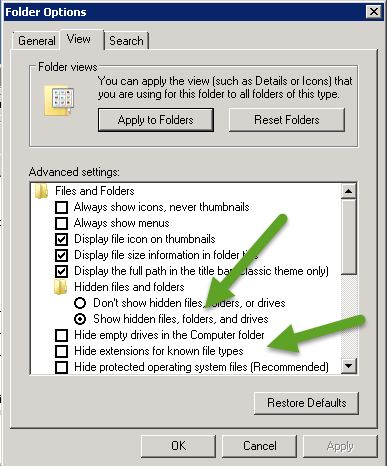
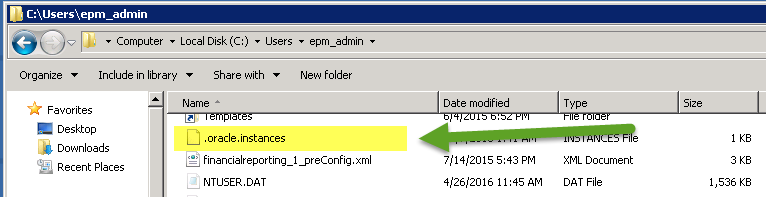
NOTE: This file may not be visible depending on your file folder view settings.

  3. Modify Windows Registry Hive & Key values – Replace the old install user with the new one
    1. Rename Computer\HKEY_LOCAL_MACHINE\SOFTWARE\ORACLE\KEY_EpmSystem_<old user>
    2. Update the values for ORACLE_GROUP_NAME & ORACLE_HOME_NAME keys so that they refer to the new user account.


  1. Modify file C:\Program Files\Oracle\Inventory\ContentsXML\inventory.xml

Replace any reference to the old install account with the new account

  1. Confirm OPatch software shows inventory properly by:
    1. Opening a Windows Administrator Command Prompt
    2. Navigate to the Oracle\Middleware\EPMSystem11R1\OPatch folder
    3. Execute the Opatch utility:Opatch lsinventory –oh <Install Drive>:\Oracle\Middleware\EPMSystem11R1 –jdk <Install Drive>:\Oracle\Middleware\jdk160_21
    4. Visually verify that the installed patch list corresponds with what has been installed

Oracle products have been installed to multiple accounts

In this scenario, multiple accounts have been used to install Oracle software. Patching attempts may fail or appear to operate successfully, though not all products are truly updated. To resolve this issue, the Oracle Inventory will need to be rebuilt targeting one user account.

NOTE: It is strongly recommended that a generic/service account is used for Oracle installation / patching to prevent these issues.

To rebuild the Oracle Inventory, perform the following steps:

  1. Log onto the server as the account which will contain the Oracle Inventory
  2. Execute the createInventory.bat script located in the <Install Drive>:\Oracle\Middleware\EPMSystem11R1\Opatch

Screen Clipping

  1. From the main menu, click on the Install menuScreen Clipping
  2. Scroll through the contents list to confirm that all installed products are reflectedScreen Clipping
  3. Monitor the Installation progress.NOTE: This may run for a while, > 10 minutes

    Screen Clipping

  4. On the Specify Source Location screen, provide the location of the products.xml file.NOTE: Should be <Install Drive>:\Oracle\Middleware\EPMSystem11R1\common\epmstage\Disk1\stage\products.xml

    Screen Clipping

  5. Specify the Oracle Inventory Home DetailsNOTE: By default this is OUIHome / C:\OraHome, use OUIHome1 & C:\OraHome1

    Screen Clipping

  6. Scroll through the provided list and ensure your products are shown and then click NextScreen Clipping
  7. Review items on the summary screen and click InstallScreen Clipping
  8. Upon completion of steps above, re-run the Opatch utility to confirm installed products now appearScreen Clipping

FDMEE Essbase/Planning Script Execution Glitch

FDMEE Essbase/Planning Script Execution Glitch

When targeting Essbase/Planning applications through FDMEE, a particularly useful feature is the ability to trigger Calculation scripts before and after the Load process as well as before and after the Check process. Not only can you execute scripts, but you can control the execution order and pass script parameters. This functionality is quite useful for executing fixed scope data clear operations before the data load and executing targeting aggregation/calculations after the data load has been completed.

Figure 1 – FDMEE Target Application Calculation Script Editor

While this feature works great when the scripts are working, what happens when there is a script failure? If a script executed during the Load process fails, should the FDMEE Load step report a failure? (even if the data loaded?) How about a script failure during the Check step? Would you be surprised to know that currently in 11.1.2.4.210, this is not the case?

In the event of a successful load process, even if a script error occurred, all FDMEE “fish” steps will return gold and the Process Monitor report will reflect the same. (e.g. no issues) Your only indication of a failure will be in the job log for the data load process!

If you are currently leveraging this functionality, please be aware of this quirk until this is corrected!

NOTE(s):

  • 11.1.2.4.100 (Patch 20648390) advertises this as being fixed; however, it still presents itself in 11.1.2.4.200+ [See Defect: 20631385]
  • An enhancement request, 25217240, was created for this issue when submitted in 11.1.2.4.200. I do not know if this has been implemented yet; however, no fix is listed in the Defects Fixed Finders Tool through 11.1.2.4.210

Steps to Recreate [target a non-existent script]

#1 – Create FDM Target Planning Application and associate a Calculation script that does not exist in the target application


Figure 2 – Create Calculation Script references for our sample Target Application

#2 – Create your Location / Data Load Maps / Data Load Rule / etc.

#3 – Load a data file through and confirm that the Process Monitor reflects success.


Figure 3 – Perform a data load and confirm that the Process Monitor User Interface shows no errors

#4 – Pull Process Monitor report and confirm no errors reflected.


Figure 4 – Run the Process Monitor Report to verify it also does not reflect any errors

#5 – Review the log file

Since the script doesn’t exist, the FDMEE log will reflect an Essbase error due to the non-existent script.


Figure 5 – Review the Job log to verify an error is reflected in the logs

Version Information:


Figure 6 – Confirm version of FDMEE

Workaround

If your load process is being performed manually, the easiest recommendation is to have users review the log to confirm successful script execution.

If you are performing automated processing where it is not feasible to manually review logs, considering implementing an Event script to scan the log file for script success/failure and using that to trigger a failure in FDMEE / Error Log / Email Notification / etc.

PBCS Data Loading Glitch

PBCS Data Loading Glitch

While building out data load automations for PBCS and FCCS recently, I ran into a somewhat annoying issue when loading data to PBCS. Even more surprising is that Oracle claims it works as expected….. This post will explain the issue and provide a really simple work around until this gets properly addressed.

The Problem

Anyone who has worked with FDM Classic, FDMEE, or Data Management for any amount of time has run into at least one failed data load due to invalid dimension member(s) in their exported data. While the data load process should ensure that the target application metadata is current before loading data, this doesn’t always happen. (e.g. last minute source ERP updates that do not get properly communicated to the EPM team)

While a data load failure isn’t optimal, typically this failure is easy enough to identify and fix based off of the feedback provided from FDM/FDMEE/Data Management and the target application.

FDMEE / PBCS Merge Load Failure

FDMEE / Planning Merge Load Failure

cid:image010.png@01D1E6E3.8124EAE0

Data Management / FCCS Merge Load Failure

Unfortunately, when you perform a Replace export to a PBCS target application, under some circumstances you will get a quite unhelpful response:

Data Management / PBCS Replace Load Failure

What Happened?

When performing a Merge export, FDMEE/Data Management simply passes the generated data file to the target application for loading without any pre-processing. When performing a Replace export, a data clear script is dynamically generated based on the members contained in the export data.

The script will clear data for every intersection of Scenario, Year, Period, Entity, and Value dimensions. In the event that one of those members is missing in the target application, the dynamic clear script will contain an invalid member resulting in the error shown above. While the error shown above is completely legitimate, it isn’t meaningful enough to allow you to locate the member easily.

Oddly, if you recreate this scenario when loading to FCCS, you will have a much different result! When performing a replace load to FCCS, invalid members will result in meaningful errors that include the invalid member name(s)! Even more odd, Oracle Support will tell you that both are working as designed. It would seem that PBCS should behave similarly to FCCS to simplify troubleshooting efforts. (Perhaps if enough people raise this as an issue, they will address it?)

Work Around

The easiest way to work around this issue is to perform two data exports to PBCS for Replace operations. The first export should be a Merge load. As the dynamic clear script will not be generated for a Merge, this will result allow you to receive specific errors in the event that there is a data load failure. After have a successful Merge load, then perform the Replace load to ensure that all data gets cleared, etc.

Job Output from Merge/Replace Load Automation Process

Oracle Hyperion EPM Environment Branding Made Easy!

Oracle EPM Branding Made Easy

For IIS and OHS

Overview

A common pain point when working in multiple EPM environments is ensuring that you are working in the right one.  “Out of the box”, each environment visually looks exactly the same.  As no one wants to be the person that accidentally makes a change in the wrong environment, people have tried all sorts of ways to remedy this issue.

Typically, people physically swap out image files for the individual web applications; however, the solutions are problematic for multiple reasons:

  • require manual file system changes
  • require rework since patching / reinstallation / reconfiguration will wipe out the changes
  • updating requires modification to Java WAR/EAR files which could lead to unintended issues
  • does not work properly in all versions of EPM due to content-length limitations
  • does not scale well if branding multiple products

The solution below resolves all of these issues by intercepting image requests at the webserver level via URL Rewriting.   Utilizing URL Rewriting allows us to:

  • use a small number of images, in one central location, for multiple products
  • easily scale and allow for multiple branding options
  • significantly reduces the likelihood of our branding changes being lost due to patching, redeployment, installation, configuration
  • avoids manual manipulation of EPM application files..

The following walk-through will show you have to use URL rewriting to replace the Oracle logo contained in the upper corner of most EPM applications with one shared image.

NOTE: URL Rewriting could also be leveraged for other uses cases such as globally redirecting all EPM users to a maintenance page while allowing admins to access the system via a special URL.

Oracle logo swapping

There are a few images that lend themselves nicely to branding replacement as the images are used globally among all the EPM products. The red Oracle logo (oracleLogo.png) is one such example. The oracleLogo.png file appears in the title bar on many of the pages, such as the initial log on page:

A quick search for this file, on a webserver running most EPM products, reveals how common it is:

As the same file is virtually used in every EPM product, the best way to replace this image is through URL Rewriting. URL Rewriting instructs the web server to replace requests for a given URL with a different URL of our choosing.

For instance, if a user requests http://EPM.COM/EPMA/oracleLogo.png, we can tell the webserver to re-reroute that request to http://EPM.COM/MyCentralLocation/myCoolerLogo.png. Since this functionality supports regular expressions, we can create one rule to replace requests for almost all of the EPM products. (DRM & FDM need additional rules)

Implementing URL Rewriting on IIS

To implement URL Rewriting for the oracleLogo.png file, perform the following steps:
[NOTE: The screen shots below depict IIS 7/7.5; however, this process works for all currently supported versions of IIS]

  1. Create a replacement oracleLogo.png file. As the original file has a height of 25 pixels and a width of 119 pixels, it is imperative that your image is the same size. If you attempt to use an image with a different size, it will be scaled to fit and it may not look how you want it to.Sample images are shown below.

    (NOTE: We will use the QA file for the rest of the IIS walkthrough)
  2. Copy your replacement logo to a location accessible by the web server and the end users. (HINT: The IIS WWWROOT folder is typically available to all users and is a good common spot)
  3. Confirm that you can access this file via Web Browser
  4. Confirm that IIS Rewrite is installed on the Web Server.
    (If it is not, follow the steps in Appendix A)
  5. Start Internet Information Services (IIS) Manager
  6. In the connections panel (on the left), expand the Server, Sites, and then Default Web Site.
  7. In the right window, click on Features View and then double click on the URL Rewrite button.
  8. In the Actions panel (on the right), click on Add Rule(s)
  9. Click on Blank rule
  10. Complete the Inbound Rule Screen as follows
    1. Name: oracleLogo Replace
    2. Match URL
      1. Requested URL: Matches Pattern
      2. Using: Regular Expressions
      3. Pattern: (.*)/oracleLogo.png
      4. Ignore Case: [Checked]
    3. ConditionsSkip, No changes required.
    4. Server Variables Skip, No changes required.
    5. Action
      1. Action Type: Redirect
      2. Redirect URL: http://<Web Server Name Here>/oracleLogo_qa.png
      3. Append query string: Checked
      4. Redirect type: 302 Found

  1. Click Apply
  2. Confirm changes were saved successfully
  3. Test a page
  4. For FDM add a rule as follows:
    1. Name: FDM Logo
    2. Match URL
      1. Requested URL: Matches Pattern
      2. Using: Regular Expressions
      3. Pattern: (.*)/logo.gif
      4. Ignore Case: [Checked]
    3. ConditionsSkip, No changes required.
    4. Server Variables Skip, No changes required.
    5. Action
      1. Action Type: Redirect
      2. Redirect URL: http://<Web Server Name Here>/logo_qa.gif
      3. Append query string: Checked
      4. Redirect type: 302 Found


Implementing URL Rewriting on OHS

URL Rewriting in OHS is relatively simple as the capability is activated out of the box in the version that is installed with EPM products. To redirect oracleLogo.png in OHS, perform the following steps:

  1. Copy your replace image to the OHS Root folder.
    cp /oracleLogo-TRN.png /Oracle/Middleware/user_projects/epmsystem1/httpConfig/ohs/config/OHS/ohs_component/htdocs/
  2. Update the epm_rewrite_rules.conf configuration file for the redirect actions
    NOTE: For each file above, create a RedirectMatch entry similar to below:RedirectMatch (.*)\oracleLogo.png$ https://<ServerNameHere>/oracleLogo-TRN.png

  1. Restart OHS
    cid:image004.png@01CFB70C.BCE74F40
    cid:image005.png@01CFB70C.BCE74F40
  2. Open a Web Browser (after clearing all caches / temporary files) to confirm update has taken place

Appendix A – Install URL Rewrite on IIS

If your IIS server does not already have URL Rewrite installed, perform the following steps to acquire / install it from Microsoft.

  • Download URL Rewrite


  • 1
  • 2